Wednesday, February 29, 2012

Feeling Blue?

...er Navy?  Howdy friends!  It is a gorgeous day here with the sun shining and the temperature in the 70's!  Gotta love that Texas weather - watch out, it could be snowing tomorrow!  Not really.

Earlier this week I made a Thank You card for a friend of mine and I happened to come across this post from Moxie Fab World.  The Cure For The Winter Blues Challenge!!! This became my inspiration for making this card.  I love it!!


TTFN,
Jennifer

Supplies:
all supplies used are from Papertrey Ink unless noted otherwise
Cardstock - Select White, Enchanted Evening
Ink - Fresh Snow, Enchanted Evening
Stamp -  A BigThank You Limited Edition, Background Basics: Retro
Twill Tape - Wrights
Copic Marker - B99
Embellishments - Button, Nail Head (Hobby Lobby)
Adhesive - ATG (Scotch)
Tools - Corner Rounder (Creative Memories)

Monday, February 27, 2012

Forgot to Show You!

Our decorated Valentine's Cookies that chica and I did together!


and the one she did - with a photo shoot!


Jenn

Friday, February 24, 2012

It Wasn't My Idea

Howdy friends!!  Happy Friday to you!

I've had a project in mind on the backburner for quite sometime and finally took the plunge!  First let me say that I am addicted to a few things - 1) PINTEREST 2) Fabric pieces from the clearance section 3)Burlap and Canvas specifically - see #2.  More on this in a moment.

I found a brand new lampshade (still in the package) that originally came from World Market, but found at GoodWill for $3.00!  I was so super lucky that there were 2 of them, so I snatched them up knowing what I wanted to do.  Sometime in the past year I've collected several bundles of burlap for cheap - like a yard or more for around $2.00 each.  So, I can now say that I've made a custom, designer inspired lampshade for CHEAP!  Another addiction of mine...

Okie dokie - back to my number 1 addiction - Pinterest.  Oh.My.Goodness!  I found several pictures of burlap lampshades and knew I could do it too!  Here are a couple of examples:


There are a few more I think I might try as well just to quickly update my shades for as little moolah as possible!  The second one I'm going to try very soon.


Just in case you aren't entirely bored yet - I wanted to share my version of the burlap lampshade.  Take a looksy:


LOVE!!!  Burlap, scissors, and hot glue - THAT.IS.ALL!   Two things I learned - 1) I would have made longer strips to give more bulk 2) I would have put them closer together!  Oh well, still love how it turned out!

Thanks for stopping by today! 


Tuesday, February 21, 2012

Glitter Buttons!

Howdy friends!  I just love me some glitter - and PTI's Make It Monday challenge is the perfect opportunity to use glitter!  I have to say that I learned something I never thought of before - SPRAY adhesive to adhere glitter to buttons!  Really?  Its that easy?  You mean, no more gloopy, gloppy, gluey mess?  That's right friends!  It really is that easy!


I thought how cute the middle part of flowers would look with glitter buttons - so that's what I did!  Isn't it bright and cheery?!  I cannot wait to send it to a friend to make her smile!

ttfn!

Jenn

Supplies: (all supplies are from Papertrey Ink unless noted otherwise)
Cardstock - Lemon Tart
Stamps - Honey Bees
Hybrid Ink - Dark Chocolate, New Leaf, Plum Pudding
Watermark Ink - VersaMark
Embossing Powder - Clear (American Craft)
Ribbon and Buttons - Hobby Lobby
Glitter - Gary's UltraFine Glitter (Gary M. Burlin Co.)
Adhesive - ATG (Scotch); 450 Quick Dry (Helmar)

Thursday, February 9, 2012

PTI Challenge - Day 5

Howdy friends!  Today, Papertrey Ink announced it has set up a Pinterest Board!!!!!  WOW!  How cool is that?  The challenge for Day 5's celebration is to either use one of the talented Design Team's Pinterest inspiration, or use one of our own Pinterest inspirations.  I chose to use my own - this is mine:


You know, I'm always in need of a Thank You card and I'm usually creating one on the fly.  Last year I focused on Christmas cards, and this year I think I'll focus on the everyday type cards.  So, with that, I've created my first Thank You card based on the above inspiration.


SQUEAL!!!  Love it!!!!!

"Thank you" for stopping by today!

Supplies Used:
All supplies are Papertrey Ink unless noted otherwise.

Cardstock: Select White, True Black
Hybrid Ink: Fresh Snow
Stamps: Gracious Vases, Fillable Frames #10, Mod Squad, Botanical Silhouettes, Cupcake Collection, Delightful Dahlia, Honey Bees, Sentiments (Michaels)
Adhesive - ATG (Scotch)

Wednesday, February 8, 2012

PTI Challenge - Day 4

Howdy friends!  I'm sharing another card I made for Papertrey Ink's 5th Anniversary celebration!  Today, I made a Valentine card to send to one of my nieces.  Well, actually I made 3 cards today for each of my 3 nieces, but only one was based on this challenge.  Here is the inspiration card I am using:


Lovely isn't it?!  I made this card using Erin's layout and color palette.


That's all for today.  Thanks for stopping by!

Supplies used:
All supplies are Papertrey Ink unless noted otherwise.

Cardstock - Select White, Aqua Mist, Raspberry Fizz
Stamps - Background Basics: Retro
Hybrid Ink - Hibiscus
Image - Papertrey Ink 2012 free download
Embellishments - Twine (The Twinery), Button (Hobby Lobby), Pen (GellyRoll)
Adhesive - ATG (Scotch)


Monday, February 6, 2012

Celebrating 5 Years with PTI

Howdy friends!  I know, I know - you're surprised I'm posting 2 days in a row right!  Well, me too....

One of my all time favorite stamp companies, Papertrey Ink, is celebrating their 5th anniversary this month with lots of fun surprises.  Each day until Feb. 14th, they are issuing challenges on Nichole Heady's blog for everyone to participate in.  Today's challenge is to use one of the FREE digital downloads that their stamp designers came up with.    I chose to use the design by Dawn McVey - gotta love some pink!!

Check out my creation:


Supplies:
All supplies are from Papertrey Ink unless noted otherwise
Cardstock - Select White, Hibiscus, Raspberry Fizz
Ink - Perfect Match: Fresh Snow, Hibiscus; Palette: Raspberry Fizz
Stamps - Dawn McVey's free digital download, Turning a New Leaf, Background Basics: Retro
Dies - Limitless Layers
Embossing Folder - Intricate Swirl (The Paper Studio)
Adhesive - ATG tape (Scotch), Zapdots (Helmar)

Sunday, February 5, 2012

Felt Flower Pillow Tutorial

Howdy friends!  I have a few projects in my file that I need to share with you - so today, I'm showing you how to make a large felt flower to pin on a pillow for your home decor.  I bought a pillow form from Joann's and made a simple pillow cover from canvas.  I put in a zipper so that I could clean it if needed.  My first flower looked like this:


I cannot remember where I first saw how to make this, so I apologize for not giving credit where credit is due.  I used this flower in the Fall right after I got these 2 zebra chairs for my anniversary (thanks honey!!). Now that it is Winter, I wanted to change the color scheme a bit.  With the beauty of a safety pin, I can change out the pillow decor very quickly!  Here are some pictures showing how I created my grey flower.

What you need:
Scrap of heavy weight fabric - I used canvas I found in the clearance bin at Hobby Lobby.
Plate - I used a salad plate
Pencil
Scissors
Felt in color of your choosing
Low temp hot glue - I promise, you WANT low-temp glue!!!!  Don't ask.
Safety Pin
Embellishment if wanted


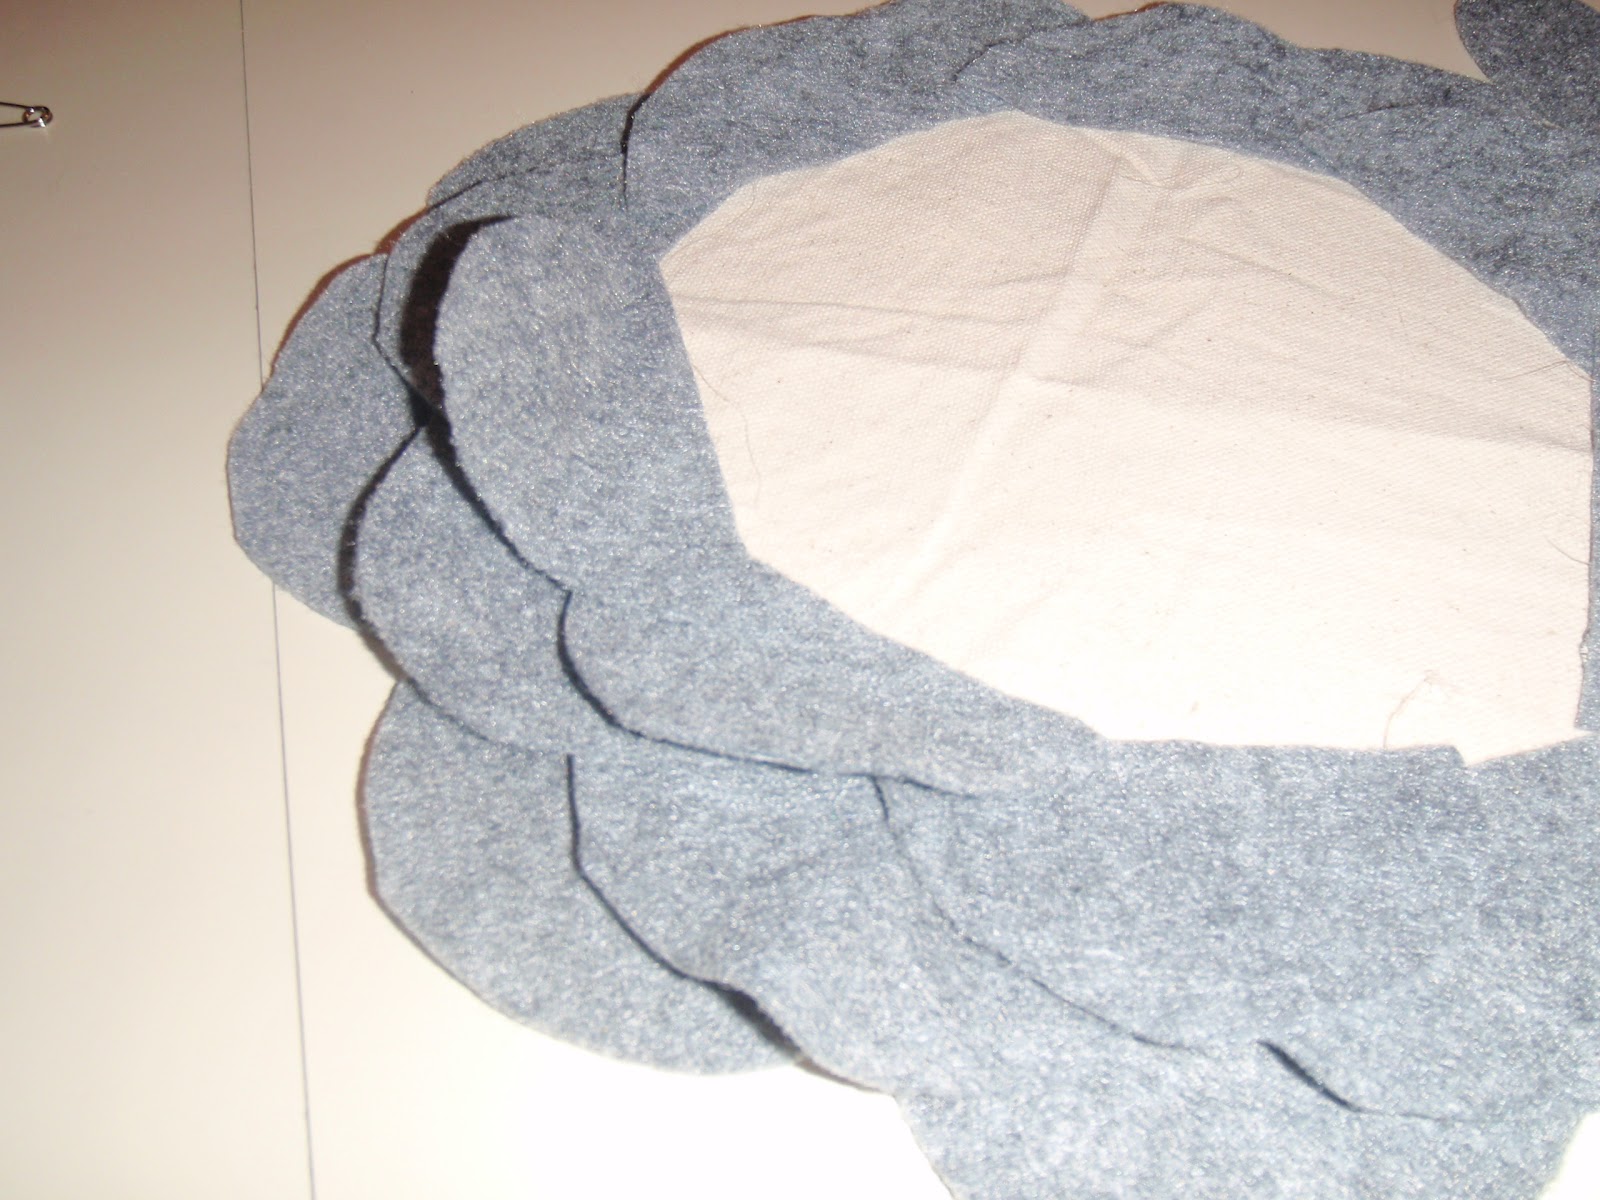
Trace your plate onto canvas


Trace circles onto felt (use a glass) or free hand them like I did.  Cuz that's how I roll!


Cut out circles, then cut circles in half.


Lay half-circles around outer edge of canvas circle.  Glue into place.


Layer half-circles, continue layering and off-setting circles as you approach the inside of the circle.


As you approach the center, the half-circles will start to really overlap.  That's okay.  Just pinch together.  See below.


When you get as many half-circles glued in as you want, then you can finish the center.  I glued a button into the center to hide the edges.


Finally, use a safety pin to attach the flower to the pillow!


Voila!  Instant decor change!  Ok - not instant, but this project took me about 30 minutes total!  

One more look:


                                                Before                                              After

Thanks for stopping by today!

p.s. I'm linking up today for Brassy Apple's Make It Monday series!!